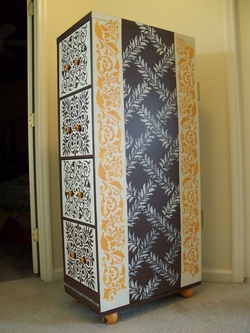
About three weeks ago, I purchased this file cabinet from a neighbor, and have been working on it since as time allowed. It was finally completed today. I love to stencil, so many of my furniture pieces have stenciling somewhere. For this one, all the stencils were from Royal Designs Studio, one of my favorite stencil suppliers.
I started by taking off all of the hardware, cleaning, then lightly sanding the whole thing, followed by a coat of primer. First I painted it a burnt orange color, but decided I didn't like it, so changed that to the burnt umber. Deciding which stencils to use was difficult, since I own so many. The tile stencils seemed to be made for the drawer fronts, then I chose a couple of borders I liked and painted the lighter stripes on the sides. I stenciled the middle first, then went to find hardware. I was glad that I hadn't stenciled the smaller borders on the side yet, since I found the nice little pumpkin colored pulls. Matching the color of the pulls with the border helped tie it all together. Then I just had to put the ball feet on it for some whimsy (learned from Jennifer Ferguson of Artistic Painting Studio and the Stencilled Garden).
I started by taking off all of the hardware, cleaning, then lightly sanding the whole thing, followed by a coat of primer. First I painted it a burnt orange color, but decided I didn't like it, so changed that to the burnt umber. Deciding which stencils to use was difficult, since I own so many. The tile stencils seemed to be made for the drawer fronts, then I chose a couple of borders I liked and painted the lighter stripes on the sides. I stenciled the middle first, then went to find hardware. I was glad that I hadn't stenciled the smaller borders on the side yet, since I found the nice little pumpkin colored pulls. Matching the color of the pulls with the border helped tie it all together. Then I just had to put the ball feet on it for some whimsy (learned from Jennifer Ferguson of Artistic Painting Studio and the Stencilled Garden).
 RSS Feed
